Problems with Basic Battle Drills

Author:  Instructor JB

"What's wrong with basic military battle drills?"

In our Squad-Level Infantry Rural Combat online training course, we explain the logic behind traditional United States Army battle drills. While the concept of the basic battle drill itself is not wrong, many Army leaders misunderstand the nature of battle drills and how they are supposed to be employed. We present the case that this tendency for misunderstanding comes from flaws in the way that the Army explains and teaches battle drills in doctrinal manuals and schools. We then point out several problems with battle drills the way they are typically executed by Army units. This article will cover some of those arguments.
For sake of brevity, we assume readers are already familiar with the standard “suppress and flank” battle drill. For those who are not, refer to the Figure 1 diagram at right.

In simple terms, the "suppress and flank" battle drill involves one element (A) laying down suppressive fire while a second element (B) moves around to the right or left in a wide, bold flanking movement to attack the enemy in a surprise assault from the side.

Figure 1

PROBLEM 1: 
Typical Engagement Range and Ammunition Load

While the standard suppress and flank battle drill is intended only as a guideline or starting point for tactical maneuver, there are a number of problems with trying to execute the battle drill exactly as prescribed in the Army manual.

The first problem has to do with the distance of the flank. A typical engagement distance in conventional warfare could be as far as 200m or 300m. This means if the flanking element makes even a moderately bold flank (as shown in Figure 2), the total movement distance for the flanking element could likely be farther than 500m. Moving 500m through dense terrain in full gear, especially at night, takes time.

Then, consider that if machine guns in the support position are firing at a sustained rate of fire, based on standard U.S. Army basic ammo loads, the light machine guns will have probably expended all their ammunition and the medium machine guns will be at least half-empty by the time the flanking element is finally in position to assault.

These figures are not exact since many variables come into play. However, with the weapons and ammo available to the squad, a long, bold flank as typically taught and practiced will likely present numerous problems.
Figure 2
Write your awesome label here.

PROBLEM 2: 
Element Isolation and Exposure to Unknown Threats

Given the engagement ranges just discussed, by the time the flanking element is close to the assault position, it will be able to see a lot farther beyond the area originally visible when the unit made contact.
In the example in Figure 2 with shaded observation areas, the lead team unexpectedly makes contact near the limit of its observation range and will see only a single enemy element.

As the trail team flanks around and moves forward, it may see and be exposed to additional enemy elements not visible to the support element. The support element therefore cannot provide supporting fire to help protect the flanking element from these new threats.

Furthermore, given that the flanking element is attempting a bold flank, the flanking element might be so far away that it is not even visible to the support element when these new enemy elements appear. This could leave the flanking element completely isolated and facing superior forces from multiple directions.

At this point the two elements are no longer mutually supporting and therefore cannot effectively break contact with the enemy.
Figure 3

PROBLEM 3: 
Unpredictable Enemy Reactions
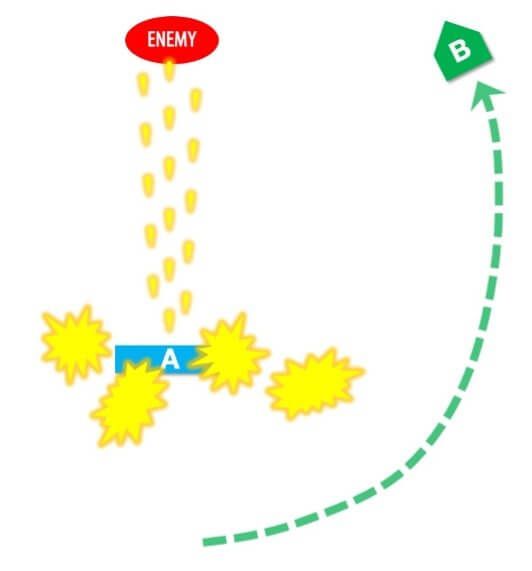
The basic battle drill formula also assumes that the enemy either chooses to remain stationary or is unable to do anything because they are completely suppressed by supporting fire. While either of these situations is possible, it would be foolish to assume that the enemy will do nothing in every case.
Combined with the possibility mentioned earlier of additional enemy units further away that you didn’t initially identify, there are quite a few counteractions the enemy might choose to employ against your flanking movement.

For example:

  • The enemy might attempt to flank you from the same side or the opposite side of your own flanking element.


  • The enemy might attempt to attack and destroy your support element.


  • The enemy might anticipate your flank and wait in ambush for your assault element.


  • Even more likely, the enemy will simply try to pull back to break contact.


Any of these actions changes the nature of the scenario and makes the basic battle drill formula break down in some way.
Figure 4

PROBLEM 4: 
The Threat of Enemy Indirect Fire
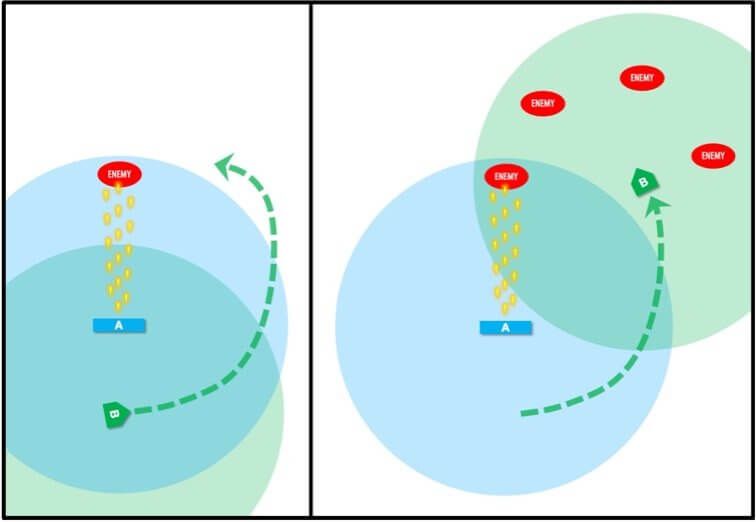
As already mentioned, depending on the engagement range it can take the assault element some time to bound around into the assault position.

If the enemy has indirect fire assets like artillery or mortars, he will likely call in a fire mission as soon as the engagement begins.

You should study patterns for enemy artillery employment and response time to know the approximate time window you have before rounds start falling on your position.

If enemy artillery response time is fast, it might not be safe or wise to leave a supporting element in place for a long period of time while you attempt to move to a flanking position.
Figure 5

PROBLEM 5: 
Enemy Attacks from Other Directions

Battle drills as explained in doctrinal manuals can apply to enemy contact in any direction. However, because the specific examples, drawings and steps in the manuals most often focus on enemy contact to the front, military units frequently end up practicing only attacks to the front and fail to practice the battle drill in different directions.

While the fundamental steps and movements of the drill remain similar, there are some important changes in how you execute the drill based on the direction from which the attack is coming.

Taking a more flexible, less formulaic approach to fire and maneuver will set you up for success when encountering enemies from different directions.
Figure 6
©Copyright Special Tactics, LLC. Published with permission.